How to Touch up Paint for Perfect Automobile and Motorcycle Refinishing
Scraped, scratched, keyed. Damage to your car is distressing. We sympathize. Your car is one of your most expensive possessions. You save for it, take good care of it, drive responsibly – and then something happens.
ScratchesHappen is here to help. Our goal is to make your DIY touch up repair an excellent experience. You’re here because you’ve decided to get some touch up paint and have a go yourself at repairing the damage on your car. It’s the holy grail of DIY projects. It’s not rocket science, but we imagine you’d like to get it right the first time, right?
There are many touch up paint products out on the market. So – how do you know what kind of paint you should use? How do you know what to do? After all, automotive paint is quite high tech and your car manufacturer, the original equipment manufacturer (OEM), used high-end paint booths, spray guns, and chemically sophisticated primer, basecoat, and clearcoat to give your car that beautiful finish. How are you going to achieve, as body shops call it, an “invisible” repair?
A Repair That Gives the Illusion of Perfection
To achieve an invisible repair, you need to choose the right paint, apply it with the right tools, and abide by the chemical principles of your paint (dry time, humidity, etc.) At ScratchesHappen, we give you the knowledge and insights to make a cost effective fix to expensive paint.
Here is what you’ll find in this article:
Part 1: Automotive Refinish – Understanding Touch Up Paint
Knowledge about car paint and refinish formulations to help you evaluate and choose the best products on the market.
Part 2: Pro Tips – How To Create Invisible Touch Up Paint Repairs
Advice and instructions about how to touch up your car or motorcycle.
Part 1: What Is OEM Automotive Paint?
The OEM (Original Equipment Manufacturer) automotive finish on your car is comprised of many layers of paint which are no thicker than a human hair – in total. All those layers together are equal to a tenth of a millimeter according to BASF. The color, gloss, and durability result from all the layers contributing properties and effects to the final finish.
Understanding how a simple, cost effective touch up paint can create an invisible repair on your expensive car finish necessitates a little knowledge about car paint.
The OEM coating on your car includes four layers: E-coat (electrocoat), primer, color basecoat, and clearcoat (topcoat). Take away any of these steps (layers), and your OEM finish loses uniform color, smoothness, UV protection, gloss, durability, spectral reflection, or diffuse reflection. The list goes on.
OEM E-coat (electrocoat)
Funny enough, your car’s paint job starts in the tub. That’s right. All the surfaces of the body need to be coated to prevent rust and corrosion. Spray painting would miss small hard-to-reach crevices. Getting the protective coating absolutely everywhere on the car body came about in the 1950s in research at the Ford Motor Company under Dr. George Brewer, notes PPG, active in that first research. Electrophoretic deposition (EPD) creates an electric field in a suspension (bath) so that the electrically charged paint particles suspended in the liquid migrate to the car body (oppositely charged electrode) and are deposited all over the surface. Then the body is rinsed and baked. The EPD E-coat was a huge innovation in OEM coatings that resulted in improved rust resistance.
OEM Primer
OEM primer is the next layer and it acts like the middle of a sandwich between the E-coat underneath and color on top.
- It protects the E-coat beneath from UV radiation.
- It has a smoothing function and a coloring function so that it becomes the ideal substrate, levelwise and tintwise, for the color basecoat above.
Spanning the grey range, the primer tint is matched in value (light to dark) to the specific basecoat color, to accentuate the particular features of that color.
OEM Color Basecoat
OEM basecoat provides color and special effects. Automotive paint has 3 components. (1) the pigment which is the color, (2) a thinning agent which creates a uniform consistency, and (3) the binder which holds the pigment and thinner together. When people refer to a car’s paint or car color, they usually mean the basecoat. Nowadays, basecoat can be solid, metallic, or pearlescent paint.
Solid paint is just color without any sparkle effects.
Metallic paint uses aluminum particles to provide sparkle. But that uniform sparkle, with no light spots or dark spots, all over your car is due to the viscosity of the basecoat pulling the flakes into parallel orientation during evaporation of the solvent. This locks the flakes into uniform position so the “flop” is maximized consistently all over. Flop is that difference in brightness you would see if you looked perpendicularly at the paint and then looked at an acute angle if the flakes had shifted position. It’s particularly important that the clearcoat for a metallic paint not dissolve the basecoat slightly so the flakes loosen and shift position. Then the paint would flop and look mottled.
Pearlescent paint often contains mica pigments to create iridescent effects. This kind of paint is usually a tri-color paint which means there are two basecoats needed to achieve the effect. Oftentimes, the viscosity and clearcoats for pearl finishes are, like metallic colors, formulated to drag the pigments into correct orientation to avoid mottling and achieve a uniform finish.
OEM Clearcoat
Clearcoat, often referred to as the “money” coat provides the brilliant gloss associated with new cars and it showcases the color underneath. Clearcoat formulations are transparent (pigment free) but an absolute necessity to ensure the basecoat color reflects light uniformly. Think of clearcoat as a suit of armor with sunscreen. Ultraviolet rays are harmful to the color basecoat which can oxidize and fade over years of exposure. Small scratches are also absorbed by the clearcoat and appear less visible than they would in the color basecoat. Even more interesting is the on-going development of self-healing clearcoats that “heal” themselves for some car brands. Elastic resins in the formulation allow gaps in the coating created by scratches to gradually fill the gap when exposed to sunlight.
Industrial Milestones and Toxicity in Automotive Paint
Clearly, paint has come a long long way from those first cars over a hundred years ago which were painted with shellac using a paintbrush. BodyShop Business, in “Behind the Paint” describes the ‘Studebaker Finish,’ a 52-day process used by carriage builders that was carried over to early automotive refinishes. Each coat of varnish took a long time to dry and lots of sanding and polishing by hand was needed for shine. Automotive News interviewed Guy Zaninovich, Model T expert in Ann Arbor, Mich. who describes the japanning process for Henry Ford’s Model T. From 1914 to 1925, the cars were only available in black, because the one week drying time was faster than other colors. Toxicity: Early finishes were highly toxic due to lead pigments, naphtha, turpentine, gasoline and the worker’s unprotected exposure to toxins during the sanding and buffing process.
Nitrocellulose Lacquer
In 1923, nitrocellulose lacquers were developed by E.I. DuPont De Nemours. The nitrocellulose chemistry developed by DuPont chemists for explosives and motion picture film was modified to get a lacquer resin that could be sprayed, eliminating the need for a paint brush. The spray gun was invented by Thomas DeVilbiss in 1907 based on his father’s (Dr. Allen DeVilbiss) invention of the atomizer (tubing, bulb, and base of an oil can) to deliver vaporized medicine. By exposing cellulose to nitric acid, a highly flammable compound was achieved. Soak cotton in it and you have gun cotton, or explosive. According to the American Coatings Association, nitrocellulose lacquers had “improved appearance, toughness, and durability versus natural oil resin paints, and also could be easily pigmented with a wide variety of color pigments, besides just black! After a couple of years of testing, in 1924 General Motors introduced the use of Duco finishes on almost their entire automotive line.”
Toxicity: Soluble nitrocellulose at the lacquer grade involves a similarly hazardous manufacturing process and nitrocellulose is a VOC that releases toxic particles into the air through evaporation that are harmful to health and the environment.
Alkyd Enamels
Nitrocellulose lacquer was commercially ubiquitous and produced on cars for around 50 years. But it still required polishing on the final coat to get a high gloss, which extended manufacturing cycles considerably. By the 1930s, alkyd enamels that dried to a gloss without polishing were in development. By combining natural products (extracted from plants) and synthetic monomers, chemists created a resin (binder system to hold pigment particles together) in alkyd enamels that possessed great film properties and dried more slowly so that a gloss formed providing shine – a natural fit for automotive paint. While the lacquer dried via a single process (solvent/thinner evaporation), alkyd enamels dry in a two-step process (solvent/reducer evaporation and binder oxidation). Enamels require air to cure and come to a hard durable surface.
Toxicity: The alkyd enamels emit high levels of toxic VOCs into the environment as the solvents evaporate and the paint cures.
Acrylic Lacquers
The thin film permitted in those alkyd enamels (synthetic oil) required fewer coats, but they also faded in sunlight over time. Once again, industrial needs were the driver for new chemistry and acrylic lacquers were commercialized from the 1950s through the 1970s. BodyShop Business describes how instead of obtaining resins from plants, like the alkyds, acrylics (plastics) were created in the lab and the resistance to UV radiation was improved. Acrylic lacquers dry in one step through solvent evaporation, so to achieve a gloss, they needed to be polished. After a couple years though, they degraded and needed extensive waxing to restore shine. Nevertheless, the viscosity of acrylic lacquer turned out to be ideal for metallic effect basecoats – the aluminum flakes laid flat when sprayed on due to the low initial viscosity and then the high molecular weight gave rise to a rapid increase in viscosity that locked the flakes in place. Acrylic lacquer was the perfect binder system for metallic paint and the 1950s, 60s, and 70s saw an explosion in metallic effect paints in part due to this technology.
Toxicity: The high VOC solvent, often containing xylene, toluene, and butyl acetate, made this paint system highly toxic as well.
Polyurethane Enamel
We have seen that automotive finishes trended from organic resins to synthetic resins. Next, in the 1960s, polyurethane multiplied the number of resins in the formulation with mixtures that included polyester, alkyd, acrylic, and others. While lacquers dried in one step, and enamels in two steps, urethane dries in three steps (reducer evaporation, binder oxidation, and catalyst cross-linking). The critical curing step here is when chemical elements crosslink (resin to hardener) in a reaction to atmospheric oxygen giving a highly durable surface. Paints for aero spatial equipment, in particular, needed to withstand extreme and rapid temperature changes making polyurethane dispersions particularly attractive for airplanes.
Toxicity: The main ingredients include isocyanates, which can contain hazardous or regulated components, and are known skin and respiratory sensitizers that can lead to asthma.
Basecoat/Clearcoat Systems
Up until the 1980s, automotive coating formulations sought to achieve color and glossy finish within one formulation. In the US, the formulations tacked between enamels and lacquers which each needed varying amounts of polishing to achieve a high gloss. Europe, in contrast, had been developing acrylic urethane automotive paint systems with high solid content for a while. The prohibitions against nitrocellulose based products due to munitions regulations following WWII had motivated Axis powers manufacturers to explore other approaches according to BodyShop Business in their article “Beyond the Paint: History!” These coatings were chip resistant but also difficult to work with in complicated processes. As European coatings manufacturers brought their highly durable products to the US, the American coatings market was forced to adapt.
The basecoat/clearcoat two layer system emerged. It allowed a basecoat for color pigment and a clear topcoat for protection and gloss. Many chemical and industrial advantages accrued from transforming traditional automotive paint from a one-step system into a two-step system. Specifically, the color basecoat enabled a greater range of color effects because the formulation focused on just the color effect with clearcoat providing the protection and shine. Pearlescent paints could be introduced by adding mica particles to the basecoat.
For the clearcoat, the unique clearcoat formulations allowed development of the 5 year clearcoat, a formulation emphasizing long-term durability and protection. Consumers usually kept a car for 5 years, so a topcoat that maintained high gloss and durability throughout this window became an industry priority. The basecoat/clearcoat system is still in use today. By separating color from clear, each one could be targeted for technological and environmental R&D to satisfy increasing industry and regulatory pressures dictating higher performing, more environmentally friendly products.
Environmental Pollution
By the middle of the 20th century, the effects of air and water pollution resulting from the Industrial Revolution beginning a hundred years earlier were being felt. Major smog events revealed to the public that industrial pollution killed humans. In the Great Smog of 1952 in London, a yellow pea soup smog descended on the city as a temperature inversion trapped air condensation with factory and home fireplace pollutants at ground level for 5 days. In some parts of the city, Londoners could not see their feet. The cost in human life proved catastrophic. Original estimates considered that 4,000 people died prematurely immediately following. Experts now believe the Great Smog claimed from 8,000 to up to 12,000 lives. In the 1948 Donora Smog event in Donora, Pennsylvania, a mill town south of Pittsburgh, 20 people were asphyxiated and 7,000 sickened from industrial air pollution from sulfur dioxide, metal dust, and carbon monoxide. Again, cold air had trapped the pollutants at ground level for 5 days. Residents requested the nearby zinc plant shut down during the smog, but they were refused, as heard on “All Things Considered” on NPR.
Elevated concern about environmental pollution motivated legislation to force industry compliance. The EPA was established on Dec. 2, 1970 and Congress authorizes the new EPA to set national air quality, auto emission, and anti-pollution standards. The Clean Air Act of 1970 was a major legislative victory and future legislative targets focused on Volatile Organic Compound (VOC) content limits and timeframes for compliance to allow industry to upgrade their manufacturing practices and apply Reasonably Available Control Technologies (RACTs). If air pollution from automobiles was a particular focus on the West Coast due to the car culture, the industrial cities of the East Coast targeted stack/vent emissions from industrial processes.
What Are VOCs?
Volatile organic compounds (VOCs) are chemicals that become a gas (vaporize) at room temperature. The EPA regulates VOCs because they can create photochemical smog. Smog (SMoky fOG) is ground-level air pollution and its main ingredient is ground level ozone. According to the EPA, this “bad” ozone results from chemical reactions between VOCs and oxides of nitrogen (NOx) in the presence of sunlight. Major sources of VOCs and NOx are industrial emissions, vehicle exhaust, chemical solvents, gasoline vapors, printing shops, building/furnishing materials, and pesticides among others. Some of these sources continue to emit VOCs when transported or stored. You may know the more familiar VOCs like benzene, formaldehyde and toluene. According to the EPA, “ozone is most likely to reach unhealthy levels on hot sunny days in urban environments, but can still reach high levels during colder months.”
VOCs in sufficient quantities cause a range of health effects: headaches, eye, ear, and nose irritation, dizziness, memory impairment and visual disorders. Some VOCs are known to cause cancer, according to the American Lung Association.
VOCs in Automotive Paint
While the early basecoats and clearcoats were enamels, based on acrylic resins, or acrylic lacquers, basecoats soon trended away from acrylic lacquers toward urethane paint through the 80s and 90s. Its high durability, chip resistance and long-wearing ability, given proper maintenance, made it automakers’ preference. The urethane paints were easy to apply and tinted primers ensured good coverage and the color didn’t look too thin. The drying time was rapid, although once the paint was mixed, the hardeners that improved durability also required the paint be used quickly after mixing or it was wasted. Unfortunately, the isocyanates in urethane paints are also highly toxic because they are strong irritants to mucous membranes in eyes, the respiratory tract and gastrointestinal tract. They can also sensitize a painter’s immune system, leading to severe hypersensitivity reactions upon re-exposure. Sensitization occurs through respiratory and dermal exposure.
If the industrial advantages of the two step basecoat/clearcoat system seem fairly obvious, the unique formulations of basecoat and clearcoat presented chemists with the opportunity to address the high VOC content which was becoming less acceptable in the automotive market.
VOC Legislation
Federal
In 1998, the United States Environmental Protection Agency (EPA) released the first federal regulation for emissions of VOCs for the automotive refinish coating industry, called the “National Volatile Organic Compound Emission Standards for Automotive Refinish Coatings.” The rule, requiring manufacturers to limit VOCs, estimated that it would reduce VOC emissions by 33% from 1995 baseline emissions, a reduction of 31,900 tons per year (tpy).
All states must comply with the national rules. However, regions, states, and local air quality boards can set stricter regulations for their territory. Certain regional areas of the US were already experiencing significantly worse air pollution and they created regulatory commissions and boards to improve regional air quality.
As regional areas developed stricter environmental legislation, their lower VOC limits served as drivers for industrial R&D to develop safer, more environmentally friendly paints industry wide.
Regional
With some of the worst air pollution in the US, the South Coast Air Quality Management Board (SCAQMD) covering southern California oversees air quality for over 17 million people, over half the people living in California. They “develop and adopt an Air Quality Management Plan,” a blueprint to bring their area into “compliance with federal and state clean air standards.”
Rule 1151
In 1998, South Coast AQMD passed Rule 1151, MOTOR VEHICLE AND MOBILE EQUIPMENT NON-ASSEMBLY LINE COATING OPERATIONS, which covered automotive refinish VOC emissions. In this first ruling, for pounds of VOC per gallon, Rule 1151 specified a “sandwich” limit for the basecoat/clearcoat system that enabled a higher VOC for the basecoat (5 to 6 lbs of basecoat when it was covered by a lower VOC clearcoat (2.1 lbs/gallon). This sandwich model just had to be 3.5 lbs of VOC or lower, so the 2.1 lbs clearcoat enabled compliance.
In 2008, Rule 1151 was amended to specify exact limits for each of the components in tables of standards. No more getting away with higher VOC solventborne basecoat. Basecoat VOC per gallon had to be 3.5 lbs or less, clearcoat had to be 2.1 lbs or less. The new rule motivated increased R&D and commercialization of various low-VOC formulations. Paints advertised as low-VOC can be waterborne or solventborne. If they are waterborne, the paint will usually also note that it is waterborne. If a paint advertises that it is low-VOC, but fails to also say that it is waterborne, you can assume that it is solventborne.
What Is Low-VOC?
Good question! In the automotive refinish market, regions of the country with low-VOC regulations limit VOC to 2.1 lbs. per gallon for primer and clear and 3.5 lbs. per gallon for basecoat color for low-VOC compliance – Southern California, is an example. Other areas of the country are National Rules (EPA) areas and no federal legislation exists to dictate the VOC limits for a low-VOC automotive paint product (although the EPA does regulate the VOCs from some body shops and of course the auto manufacturing plants.) Nevertheless, other regions/state associations are gradually moving to adopt the stricter VOC limits. From an industry standpoint, the paint manufacturers moved forward with commercialization of low-VOC formulations in anticipation of adoption of stricter limits. Some low-VOC formulations are solventborne and some are waterborne.
What Do the Pros Consider ‘Low-Voc’ Paint?
These guidelines from the California Air Resources Board are the limits that most professionals consider to be ‘low-VOC’:
| Product | Low-VOC Limit from CARB |
| Primer | 2.1 lbs./gallon |
| Color basecoat | 3.5 lbs./gallon |
| Clearcoat | 2.1 lbs./gallon |
Note: Two other associations of states create air pollution rules for their regions: Lake Michigan Air Directors Consortium (LADCO) Standards for Illinois, Indiana, Michigan, Wisconsin and Ohio and the Ozone Transport Commission (OTC) for Maine, New York, Rhode Island, Delaware, Pennsylvania, Maryland, New Hampshire, Connecticut, Vermont, Virginia, Massachusettes, New Jersey, and Washington DC.
Low-VOC Solventborne Formulations
How Can Solventborne Paints Be Low-VOC?
Low-VOC solventborne paints are obtained using solvents marked as “exempt” by the SCAQMD because the EPA excludes compounds with negligible reactivity (less than or equal to ethane), because they contribute less to ground-level ozone. Exempt solvents include ethyl acetate, tertiary butyl acetate (TBAc), acetone, isopropanol and P-chlorobenzotriflouride (BCBTF). Thus, exempt solvents relate to less harm to the environment – not less harm to the human body – another matter entirely. According to Mopar Magazine, “Many paint manufacturers have used these solvents to comply with VOC limits mandated by Rule 1151.”
Exempt Solvents vs. Chemicals of Concern
Low-VOC paints “are used in California and other areas to conform with local air quality regulations” according to the Local Hazardous Waste Management Program in King County, Washington. Their 2019 report “Waterborne vs. Solventborne: Automotive Basecoats: An Alternative Assessment, notes “a review of SDSs of several low-VOC solventborne products revealed that they contain numerous [chemicals of concern] CoCs, occasionally at very high concentrations. Some of these CoCs are unique to low-VOC products, including styrene and tert-butyl acetate… Based on [their] limited review, low-VOC solventborne basecoats do not appear to be significantly safer than traditional high-VOC products.” Ultimately, other chemicals of concern to human health are used in low-VOC solventborne paint.
Based on our limited review, low-VOC solventborne basecoats do not appear to be significantly safer than traditional high-VOC products.”
-Local Hazardous Waste Management Program in King County, WA
Note on Styrene: Health effects of styrene include irritation of the skin, eyes, and the upper respiratory tract. Acute exposure may also result in gastrointestinal effects. Chronic exposure affects the central nervous system showing symptoms such as depression, headache, fatigue, weakness, and may cause minor effects on kidney function. -OSHA
Low-VOC Paint Performance
BodyShop Business magazine interviewed major paint manufacturers in 2011 about low VOC and waterborne paint. From PPG: “The major difference between waterborne and exempt solvents lies in their ability to match OEM finishes. Today, nearly 75 percent of OEM assembly plants now use waterborne basecoat technology for their original finishes.” Also, not surprisingly, “a compliant solvent basecoat system has limitations in the solvent choices that can be offered; subsequently, this will affect overall system performance.” From Pro Spray: “It is possible to comply with Rule 1151 amendments using exempt solvents, but not without sacrificing performance. There’s a limited selection of exempt solvents approved for use in [the] industry.” From BASF: “Using Rule 1151-exempt solvents in basecoats changes [the] evaporation rate. These exempt solvents are either very fast or very slow, which causes improper metallic orientation, resulting in poorer color match. Waterborne basecoats allow for excellent metal control and are low in VOC content.”
Overall, with almost all new cars now painted with waterborne paint, a great match to an OEM finish will also be waterborne touch up paint. Given that assembly plants use waterborne for its enhanced performance, you can expect that waterborne touch up paints will also display enhanced performance.
How Much of Paint Is Solid (Pigment) and How Much Is Liquid (Solvent or Water)?
Good question! Over time, the ratio has moved from high solvent/low solid to low water/high solid. Waterborne formulations allow a higher solid (pigment) content leading to better coverage, less paint used and fewer coats.
BodyShop Business Conference in 2011 documented the changing trends in solid to liquid in paint:
| Lacquer resin | ~ 90% solvent to 10% solids |
| Enamel resin | ~70% solvent to 30% solids |
| Traditional basecoat | ~ 50% solvent to 50% solids |
| Waterborne resin | ~ 35% solvent to 65% solids |
Part 2: Waterborne Is Better! Why?
Mopar Magazine gets right to the point: “Because water is the main ingredient, there are no solvents. There are several benefits to using this type of paint. First of all, and most obvious, is the dramatic reduction in VOCs (approximately 80 percent less than solvent-based paints). In simple terms, waterborne paints contain less VOCs than solvent-based paints, therefore, VOC emissions are less.”
We intuitively grasp that waterborne paints would be safer than solventborne paints. The lower VOC and non-toxic odor immediately trigger the idea, without even reading a manufacturer data sheet. But what many consumers don’t realize is that waterborne paint just performs better across every metric. According to BodyShop Business, “Almost all vehicle manufacturers worldwide are using some version of waterborne on their paint lines, and matching those nice bright-chroma colors is easier with waterborne. Finding just the right OEM-looking texture and metallic effect is faster. Additionally, blending water into water makes invisible edge blends much smoother.”
The table below lists some of reasons waterborne paint has been adopted by most collision centers in the US:
Waterborne vs. Solvent
| Waterborne | Solventborne | |
| Color match superiority | Approx. 75% of OEM assembly plants use waterborne basecoat for their finishes. So precise color alignment to OEM coatings | Growing misalignment between prevalence of waterborne OEM refinishes and solventborne paint technology. |
| Color match superiority | High opacity (high solid content) with anti-settling properties | Lower solid content so coverage |
| Color match superiority | No required mixing system so color consistency is better | Mechanical mixing required |
| Color match superiority | Less film build | Twice as much film build |
| Color match superiority | No binders and/or additives needed | Binders and/or additives are needed |
| Color | Truer and brighter color quality due to higher solid concentration | Less bright color due to lower solid concentration |
| Metallics | Metallic paint flop control is consistent because water evaporates at one speed | Solvent evaporates at different speeds |
| Ease of Use | Edges blend smoothly – no halo effect | |
| Ease of Use | Easy to use, learn, work with | |
| Ease of Use | Quick drying times | |
| Ease of Use | High hiding so fewer coats | More coats needed |
| Cost | More expensive | Less expensive |
| coverage | Superior. Higher solid content (pigment) mean hides better | Inferior. Higher solvent content (liquid) means more paint is needed to hide. |
| Evaporation method | Drying/curing time accelerated by air movement across the paint surface | Drying/curing time accelerated by temperature elevation |
| Evaporation method | Humidity. Water evaporates from the paint surface saturating air molecules nearby. Air circulation replaces saturated molecules with non-saturated air molecules. | Temperature. EXPLAIN |
| Environmental | Future compliance with regulations | Increasingly less compliant with regulations or non-compliant |
| Environmental | Low odor | Noxious odor |
| Environmental | Easier and less waste handling | Solvent based waste handling |
Body Shops Pros on Waterborne vs. Solventborne
Clearly, the scientific data and environmental legislation gravitates to waterborne paint. The competitive advantage presented by waterborne applies across the full range of industrial features: color match, ease of use, fewer coats, healthier working conditions and environmental footprint. In fact, waterborne paint advantages have leaped so far ahead of solventborne that they are leaving solventborne paints behind – milestones on the historical timeline up to today’s superior waterborne finishes.
But – you are here because you are not an automotive paint professional. You want some information to do the best job possible touching up your vehicle. Why not hear what a body shop pro has to say about waterborne and solventborne paint. After all, these folks are pros who have often worked decades in the business and have a passion for working with cars and just plain making a car look beautiful again. They are in the field because they love it.
How To Apply Touch Up Paint
So where is the overlap between the painting tasks of a body shop professional and your DIY repair job on a lovely Saturday afternoon with a great playlist, some paper towels, and a watch? Well, it turns out that the features prized by body shop pros translate over to your DIY repair. You too want paint that handles well, is easy to manage, safeguards your health and community, and ultimately provides that “illusion of perfection” – an invisible repair with beautiful color match. Read on to learn Pro Tips about color match, applicators and brushes, and handling paint.
Poor Hiding Colors
Some OEM color formulas just don’t cover or “hide” the substrate underneath very well. But, the deficiencies in the color formula are often not even discovered at the car plant. Why? Because at the OEM facility, a tinted primer was used underneath which was color matched to the basecoat. In effect, the tinted primer supplied the needed light/dark value to boost the basecoat color sufficiently to full coverage or hiding. The tinted primer masked the hiding problem. You can ensure your best color match by using primer and especially tinted primer for your touch up repair.
Applicators and Brushes
Applicators are dabbers and toothpicks. Brushes can be short bristles and long bristles. Brushes can be one size fixed inside the lid of a jar or assortments of various sized free standing brushes.
Brushes that are fixed inside the jar cap can be tricky to work with. When the brush in cap is unscrewed from the bottle, a massive amount of paint adheres to the brush. It’s way too much paint to dab on a small scratch, so just like a nail polish bottle, you’ll need to wipe some paint on the inner rim of the bottle. When you wipe paint from the brush on the neck of the bottle, you can contaminate the liquid paint on the brush with dried paint from the bottle – not the chemical reaction that the chemists intended. Depending on the bristle fibers, brushes sitting in paint in the bottle can eventually lose their original shape. Think of the fingers on your hand after sitting in the bathtub for a half an hour. The wrinkles on your fingers are because your skin temporarily loses the ability to regain its shape. Once the brush in a bottle is damaged, you need to buy some applicators/brushes or throw the bottle of paint away.
Freestanding brushes and dabbers can give you more control because they have a longer handle so the applicator rests against more of your hand and you have more leverage. Smaller brushes and dabbers can be dabbed into the paint with precision to avoid large gobs of paint on the brush. They can be washed and reused in the future when you car gets a ding or scratch.
What About Paint Pens or Combo-type Applicators?
Paint pens and combo-type applicators can have a brush at one end and a pen tip at the other end of the applicator. The paint resides in a reservoir in the middle. Ostensibly, there is an ease-of-use and efficiency obtained by providing a two applicator options in one device. Beware though, these types of applicators, especially the clearcoat, can gum up after repeated usage or even the cap can get stuck and require pliers, elbow grease, and even a knife edge to slice through the hardened seal in the cap. The paint pen tips are less flexible than brushes or micro-dabbers so the clearcoat in particular can easily lift off the underlying coat of paint. Be sure to practice your technique on a test paper before repairing a scratch with the pen tip.
We aren’t a fan of paint pens for applying either paint or clear coat, because the tip often dries out, making your touch up paint kit potentially unusable in the future. The other reason is that for paint or clear coat to “flow” in a paint pen, it has to contain considerably less solids than when applied by a brush or dabber. This means the paint or clear coat is quite thinned.
Basic Paint Principles
- You will be layering several layers of paint. Modern paint formulations adapt the traditional wet-on-wet or wet-on-dry techniques. Waterborne and solventborne formulations have specific drying times between layers according to water/solvent evaporation and resin oxidation. Follow the directions for your paint.
- Paint carefully. You are not slapping paint on the walls of a room. Each new layer of wet paint interacts with the layer underneath. So make your brushstrokes smooth and light so you don’t jostle the layer underneath.
- Paint by the clock. Remember, evaporation and/or oxidation change your paint layers from a liquid state to a solid. If you wait too long to apply the next component, base or clear, your paint may have dried to such a hard state that it won’t accept the new component. The chemical bonds that enable modern paint to wash easily and resist flying debris are so powerful, that hardened to their final state, they won’t take any new layers.
- Remember the color match is the combination of basecoat and clearcoat. In fact the basecoat/clearcoat system used to be combined in just one paint up until the 1980s. So when you do a test on cardboard, remember to put on clearcoat so the light reflects off of a true color match.
- Work in a clean environment that is not too hot or cold. Extreme temperature affects drying paint. Aim for 60 to 70 degrees Fahrenheit inside or outside. Someone blowing leaves nearby if you are in the driveway or cleaning up the other side of the garage if you are inside are not ideal. Blowing dust and debris will ruin your repair. There is a reason body shops and car manufacturers use spotless spraying booths.
How to Touch up the Paint on Your Car or Motorcycle
Heads up: Touching up the paint on your car or motorcycle requires touch up paint, a dry day, clean, well-lit working environment, and some brushes/applicators/toothpicks along with paper towels and a few other household tools. We’ll provide a more detailed list further on. This is just the gist to give you a sense of the scope so you can plan ahead, block in your calendar, and check the weather forecast (avoid rain and high humidity). You should set aside 3 or so hours to do the job. But relax, you’ll manage to grab lunch between layers, catch up on family phone calls, and still enjoy a good playlist.
Damage Assessment
Before you buy paint, take a moment to look at the damage that you want to repair. Make sure you have plenty of light so you can see how big the repair area is. If it is a small shallow scratch that doesn’t go down to the metal (substrate), you might not need primer. Otherwise, you want to make sure you purchase primer, preferably color matched tinted primer, so you get the truest color match from your touch up paint.
Paint Purchase
You need to purchase touch up paint that matches your car or motorcycle. To do that, you need to get the paint code for your car. Car manufacturers put the paint code in a few locations in the car, depending on make and model and the touch up paint companies should tell you where those paint code stickers are found. Touch up paint is sold in a bottle, pens, aerosols, and larger professional size containers. You can buy the paint as part of a kit that includes primer, base, clear, brushes, applicators, and polishing cloths, or as standalone paint products where you decide what components (primer and/or clear) and tools you need to buy or you might already have at home. We prefer kits whenever possible because you are less likely to find yourself in the middle of the job, on the clock with paint drying, and realize you are missing something essential for the next step. Here is a list of tools and materials to purchase and have on hand before you start the job.
Paint and Tools
| PURCHASE | HOUSEHOLD OR PURCHASE |
| Color matched basecoat | Couple pieces of cardboard for testing |
| Primer | Disposable gloves |
| Clearcoat | Microfiber towel |
| Polishing compound | Tack cloth |
| Brushes, applicators, toothpicks as needed for size of repair | Paper towels |
| Clock or watch | |
| Good handheld light (flashlight) | |
| Good overhead lighting or sunshine | |
| Chair if the damage is on the side of the car | |
| Small table near your working environment | |
| Fan or hairdryer with cool setting |
Repair Day
Now that you have stocked up on paint and tools and repair day is here, you should take a pause to plan and prep. It can be tempting to dive in and get the job done, but your goal it to achieve an excellent repair, not just a good enough repair. The illusion of perfection is the job goal of a body shop repairman every day, all day. And those pros have more experience than you. So take a moment to make a plan and do a little prep (testing your paint layers on some cardboard) like the pros. It’s a half hour well spent and may save you time in the long run. Here’s what we recommend.
Plan and Test
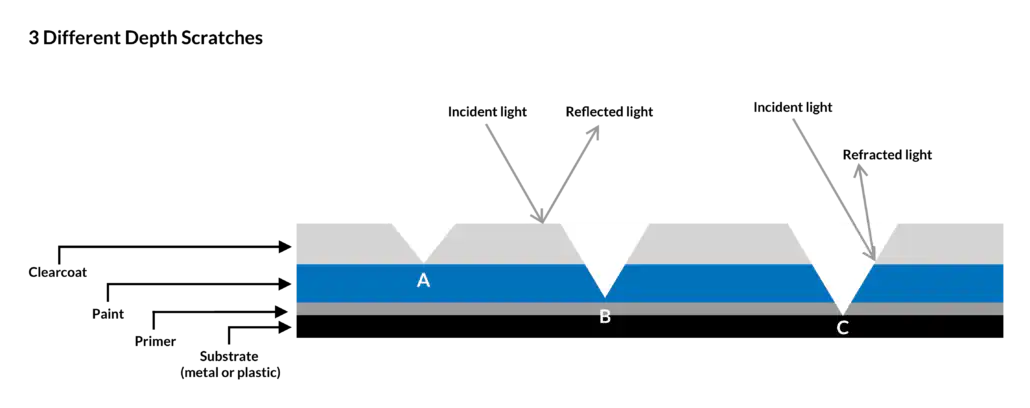
1. PLAN: You want to make a plan for how many layers of paint (primer, basecoat, and clearcoat) you want to apply to do the job right. That plan means you need to determine how deep the damage is. In the illustration below you can see paint damage that is shallow to deep. Each layer that is damaged needs to be replaced, leveled, and polished. You can always level out excess paint, and in fact you want to do exactly that with your last clearcoat being a little higher than the surrounding surface. Then you will polish it down to blend at exactly the same level with the undamaged surface around it. See the arrows diverging in the illustration for reflected light and refracted light? Any misalignment in the levels of paint adjacent to each other will lead to light refracting and reflecting side by side. Not an invisible repair. Your eye will catch the difference. If you decided not to buy primer, but now see that the damage goes down to metal, you can use extra layers of basecoat to fill in the primer level. So anticipate a couple layers of primer (if needed), 2 or 3 layers of basecoat, and 2 or 3 layers of clearcoat.
2. TEST: Use the cardboard to try out the paint. Make sure you shake/mix the paint according to manufacturer directions. It’s important to have an idea of how the paint feels going down before you actually start the repair. For example:
- Is the brush a little stiff and leaves streaks in the paint so you should choose a softer applicator? Or a really gentle hand?
- Does the brush come out of the bottle with gobs of paint that need to be wiped on the rim of the bottle?
- Is the paint really thick so you need very little on the brush?
- Is the paint really thin and drippy?
- If the damage is on the side of the car, hold up the cardboard next to the damage and see if the paint drips or the clearcoat drips. If so, use less paint.
- If you have toothpicks because you are repairing a small scratch, practice with the toothpicks so you know the right size droplet of paint to get on the toothpick.
- Test out the layers of paint you think you need for an invisible repair including primer, base, and clear. Typically, the clearcoat should be a heavier layer than the basecoat.
- Finally, make sure the paint color on your cardboard is the same as your car! Put the painted cardboard almost against the car so you can see the colors side by side. Keep in mind that the basecoat will dry matte and you need to apply clearcoat on top to see the full color match.
Prep
The pros use a spotless spraying booth and clean their tools after use every time. Similarly, you want to work in a clean environment and work on a clean surface.
- First, check if the damage is jagged or has paint flecks falling off. If you feel any roughness, sand or polish the area first.
- If you have heavy damage, maybe a bad scrape from a cement parking block, start with a coarser sandpaper (500-grit) and then smooth with finer sandpaper (1000-grit).
- Next, clean the repair area. Use regular mild dishsoap and water. Rinse thoroughly and dry with a microfiber towel. You want to dry with a cloth that will not leave cotton or paper particles on the car surface. If the damage is a bad scrape and it seems as though you can’t dry some of the crevices, you can use a hairdryer lightly to make sure everything is dry. If you do use a hairdryer, go over the surface afterward with a tack cloth to make sure no dust particles were blown into the repair area.
Primer
If you have determined that the depth of your repair requires primer, start with primer.
- Apply the primer so that all of the exposed metal or plastic is covered. Let this layer dry according to your paint directions.
- If the damage was deep, you will need to apply another coat or two of primer, letting each one dry as needed.
- Let the last primer coat dry according to your paint directions before applying basecoat.
Basecoat Color
- Apply the basecoat color according to your product directions.
- Usually, this will require light coats of paint
- Allow each layer to dry according to your product directions.
- Make sure you let the last coat dry the according to your product directions before applying clearcoat.
Clearcoat
- Apply the clear according to your product directions.
- Allow each layer to dry according to your product directions.
- Make sure you let the last coat dry the according to your product directions before applying clearcoat.
Polish
- If you purchased polishing compound, make sure you wait the required time before polishing according to your product directions.
- Polishing can help level the repair with the surrounding finish.
Good luck with your repair! We hope that the information shared here helps you achieve an excellent repair.
Leave a Reply
Want to join the discussion?Feel free to contribute!