Aerosol Instructions
Step-by-Step Instructions: Aerosol
Get professional results with the ScratchesHappen Aerosol Kit. Our detailed instructions make it easy to prep, spray, and blend for an invisible repair of larger scrapes.
USA support: [email protected]
Canada support: [email protected]
Find support articles here: https://help.scratcheshappen.com
Version 7.4
Copyright © 2025 Replicolor USA, Inc.
I. Introduction
These step-by-step instructions guide you through prep, painting, and polishing. We identify the key details needed for a perfect job. Scan Sections II and III to give yourself an overview of the process and paint, then get started in Section IV to achieve your pro finish. See the ScratchesHappen video, How to Spray ScratchesHappen Touch Up Paint, for a step-by-step demonstration of the process.
Which Kit Do You Have? Check which kit you purchased below to confirm what’s included in yours. These instructions identify the kit and materials required for each step. If you purchased the Essential or Preferred kit, you may need to provide certain materials to perform a step.
Waterborne or Solventborne? Depending on the color you bought, you may have been sent a solventborne paint or a waterborne paint. Check the Paint can (the color coat):
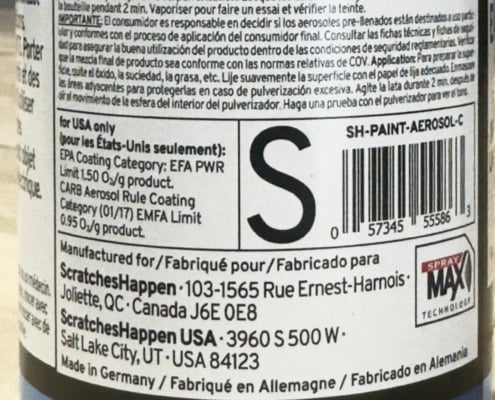
An “S” code on the can indicates Solventborne paint
- If there is an “S” code on the back panel, you have a solventborne paint.
- If your can has any other code, such as P, I or U, then you have waterborne paint.
The only step affected by this is on page 7, “Drying”NOTE: Clear coat must always be applied over the color to seal and protect it and
to achieve the color match.
The Complete Kit
- Test card
- Aerosol base color(s)
- Aerosol primer
- Aerosol clear coat
- Prep wipe
- Tack cloth
- Masking tape
- Sand paper pack
- Microfiber towel
- Polishing compound
- Nitrile gloves

The Preferred Kit
- Test card
- Aerosol base color(s)
- Aerosol primer
- Aerosol clear coat
- Nitrile gloves

The Essential Kit
- Test card
- Aerosol base color(s)
- Aerosol clear coat
- Nitrile gloves

What Tools Will You Need?
- Protective equipment
- Good ventilation
- Flashlight or handheld LED light source to inspect the finish
- Watch or timer
- Extra lint free rags and isopropyl alcohol
- Small portable fan or hair dryer
- Washing supplies:
- Soap and water for base color (waterborne)
- Paint thinner for clear coat and primer (or solventborne paint)
- Bucket of water for wet sanding
Did You Know?
You can ask Alexa or Siri what the humidity
or temperature is in your location.
“Hey Siri, what is the
current humidity?”

II. DIY Overview
First, what is paint? More than just pigment, paint is an emulsion of solids and liquid that performs according to the chemical principles of its ingredients. Today, automobile paint finishes are chemically complex, multi-component, multi-layered finishes. The final finish is the art and science of all layers working together.
How bad is the damage? First, to determine which process is appropriate for your repair, use a good portable LED light (your phone flashlight is fine) to look closely at the damage. If you see bare metal or plastic, you need primer. For deeper scrapes you may need to wet sand to smooth out the surface.
Creating invisible repairs. Aside from color match, the “invisible-ness” of your repair requires a smooth level final surface so that reflected light does not get distorted. In a spray paint repair, that can happen if you have a “hard” line from the masking tape edge. The solution is to sand or polish the boundary of your spray area, to “feather” it into the surrounding paint.
What is the test card for? The test card is for you to check color match before applying paint to the vehicle. Use the small card provided, or get a larger test card. White foam core works great.
The larger foam core also helps you get a feel for the correct speed and distance of the aerosol can as you spray over the surface. You want to apply a full coat, without runs or sags. The opacity and paint thickness will affect the coverage. This is part of the art of the repair. The color you purchased should match your car’s paint color after clear coat is applied and it has dried.
Test the clear coat for dripping/running. Determine if your surface is horizontal, vertical, or sloping. Some angles can promote dripping or running in the clear coat. Practice the clear coat on the test card and hold the test card right up next to the car (but not touching) near the repair area to determine if the clear coat will run. If it does, practice again with a less heavy layer so that the clear coat does not run. You are aiming for a layer that is heavier than that for base color but not so much that it runs.
Using Aerosol Paint
- Shake the can vigorously for 3 minutes before each use.
- If you can see small bumps on the bottom of the can from the rattles inside denting the can, it’s an indicator that you are shaking the can correctly.
- Use at 65-75 degree F.
- Use at humidity < 50%.
- Always spray a quick nozzle test before starting to spray your vehicle.
- To test for dryness, touch the masking tape at the edge of what you sprayed.
- After use, always invert the can and spray out the paint to clear the nozzle.
III. Understanding Paint
View all knowledgebase articles on how to apply paint here: How To: Tips on Paint Application
Drying temperature. The optimal drying temperature is 65 to 75 degrees Fahrenheit. Your drying times will be affected by temperatures above or below this range. Low temperature will slow drying times.
Humidity. High humidity will slow drying times, and may cause fisheye if there is too much moisture in the air. Wait for lower humidity. Note: “fisheye” looks like a water drop in the paint.
Sunlight/rain. Avoid working in direct sunlight or working on surfaces that have been sitting in direct sunlight. Likewise, avoid working on rainy days!
Layering paint. Each new layer of paint acts like a solvent on the previous layer, and the new wet paint can slightly deform or even reduce the thickness of the layer you’ve already applied. This just means you want to work gently, especially when using a hair dryer to blow air on the paint. You don’t want to blow air under pressure on the paint; you just want to move more air over the paint. So always keep it a few feet away when drying paint with a blower.
Adhesion between primer + base color + clearcoat. Each of these types of coatings has a nice porous paint surface when freshly dried, but the porousness disappears as the surface hardens. The porousness helps the next coating adhere properly via chemical bonds. So, when you transition from primer to base color or from base color to clear coat, if you wait more than 24 hours, the dried coating will not accept the wet coating correctly. If more than 24 hours does pass, simply apply another light layer of the previous coating, letting it dry less than 24 hours before transitioning to the new coating.
Exact color match. As you are adding coats of paint, the color will not appear to be a color match until it has dried. Waterborne paint can have a slight blue cast to it when wet, which disappears as the solvents evaporate (in about 5 minutes). Then, an exact color match won’t happen until the clear coat is applied and it is completely dry.
Tri-coat colors. Some colors require an additional color during application to achieve the exact color match. This includes many pearl whites and some red colors. For these colors, you will receive two different colors in your kit (identified as a tri-coat color kit): the base color and a mid-coat color. One of the cans will be marked with an L1 and the other has an L2 at the end of the paint code.
Waterborne Color Match
The base color is waterborne paint. The chemistry of this paint is such that when wet, it has a slightly blue-ish cast. Don’t be alarmed. Within a few minutes of drying, the true color will be evident. Wait for the paint to dry, with clear coat applied and dry, before evaluating the color match.
Tri-coat Paint Principles
Spray the L1 color first (base color) and the L2 color second (mid-coat).
The L2 mid-coat should be sprayed as a control (or drop)coat. See this article: Applying L2 (mid coat), Metallic or Pearl Finish Paint
IV. The Repair Process
Part 1: Preparation: Sand and Wash
Wet sand: Wet sand the area you are going to spray with 600 grit paper. This scuffing is going to smooth out the surface, and create good adhesion with the primer. If it is a large area like a door or quarter panel, consider using a dual action random orbital sander, but you can always do it by hand. For most repairs that are smaller, you can wet sand by hand.
Pro Tip: Make sure to sand away all rust, chips, and any loose paint. Sand enough to smooth out scrapes, but if they are too deep, use spot putty (#2 below). Lightly scuff the nearest surrounding clear coated paint to improve the adhesion. Feather your more heavily sanded areas into the lightly sanded areas, so they meet smoothly.
Optional Spot Putty: If you have deep scratches that sanding can’t remove, use a glazing/spot putty like 3M 907 Bondo, an easy to use, sandable spot putty to fill them in. Apply the spot putty using a body filler spreader tool. Apply a uniform layer to fill in the scratches and let it fully dry. Then wet sand (600 grit paper) the spot putty until smooth, contouring your hand to the shape of the panel, and using even pressure so you don’t create an uneven surface. Consider using a foam or wood block to wrap the sandpaper around for consistency.
Wash Thoroughly: Wash the entire area with soap and water to remove any contaminants such as wax, grease, and heavier road grime that will ruin the job. Dawn dishwashing detergent works well. Dry the area thoroughly, and if necessary, use a hair dryer on the high setting to drive any water out of cracks or crevices. Compressed air also works great to drive out water and dry the area.
Mask the area: Apply automotive masking tape to create a boundary some distance away from the repair. Consider the area you want to prep to be large enough to cover the repair, and about 10-15% more area as a buffer, to feather the repair into. Always tape and cover door handles, windows, antenna openings and the like. Use tape at the edge, and use plastic or paper beyond to protect all the nearby paint from overspray (especially if you are outside). To avoid a visible, hard tape line, we suggest a tape-folding method shown in this video: Watch this video tip on How to Mask with Tape to Create a Soft Transition Line.
Pro Tip: Try to paint to a panel line, a molding transition, a door boundary, or an angled surface, so that the repair finish blends into the rest of the finish invisibly. Solution: Don’t just tape any region around your repair, consider the area you are going to tape carefully, and have it follow a boundary line that helps the repair blend better. This will avoid having a noticeable paint line in the middle of a body panel.
Degrease the area with a prep wipe. This is an important final step to eliminate any remaining grease from your hands or other contaminants, which will show up as fisheyes in the paint finish, and require resanding and repainting.
Tack cloth: Wipe down the entire area with a tack cloth to remove dust.
Required for This Step
Complete kit: You will need to have sandpaper, masking tape, prep wipes and a tack cloth to do these steps.
Sandpaper Grit
The sand paper in the kit comes in 600, 1000, and 1500 grit.
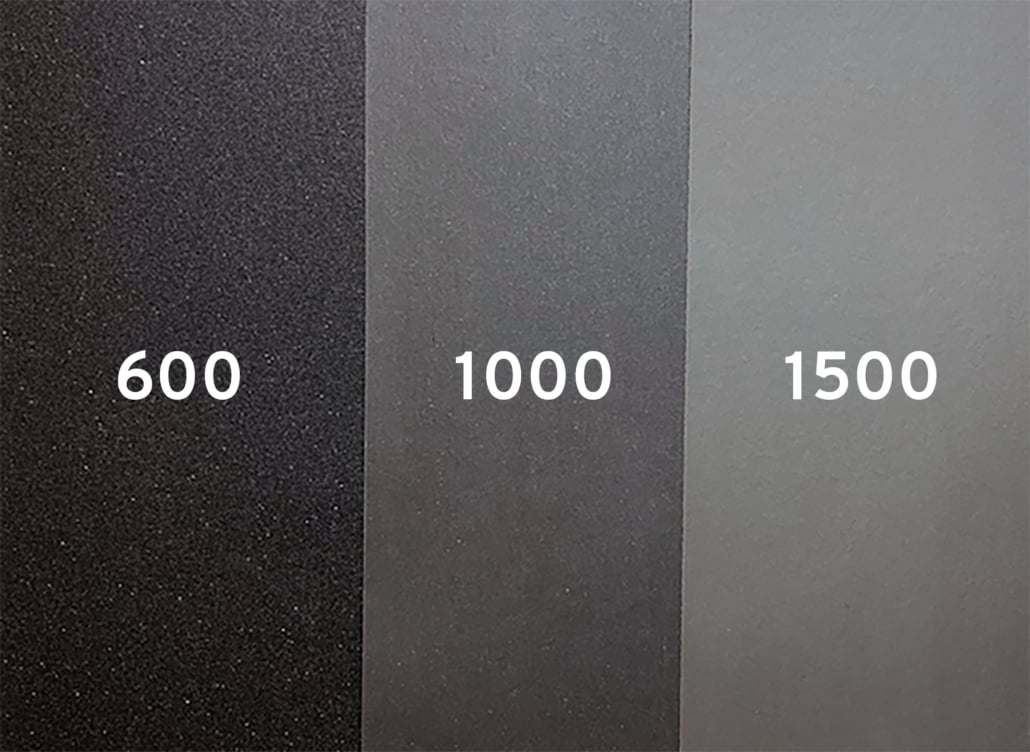
As shown in the photo above:
Dark grey = 600 (used for sanding primer or spot putty)
Medium grey = 1000 (used for sanding primer or paint between coats)
Light grey = 1500 (used for sanding between coats)
Part 2: Spray a Test Card
Always spray a test card first! Before spraying your vehicle, spray the primer (if you have it), paint and the clear coat onto a test card using correct drying times between coats as described in these instructions. See this how-to video for proper technique.
Spray distance of 6-8 inches: Spraying from too far away allows certain color pigments to dry in the air and drop out. Pigments that don’t land on the painting surface affect the color match.
Allow the clear coat to dry before comparing the test card to your vehicle paint. For your test, use at least two coats each of primer, and 3 coats each of color and clear coat to make sure the depth and coverage is enough to be an accurate test. Thin paint or clear coat won’t match properly, even if the color is correct.
Metallic, Pearl, or L2 mid-coat finish: If your paint color is a metallic, pearl or L2 finish, see this Control (or drop) Coat Explained video to correctly spray these paints.
Required for This Step
Any kit will have the test card needed for this step.
Part 3: Spray the Primer
Note: if you don’t need to spray primer, skip to Part 4.
Nozzle test: Before any spray application, shake the can well for 60 seconds, and then trigger a short test spray to make sure the nozzle is clear and paint is coming out properly, and uniformly (no blobs). Do this on a fresh card so you can see the pattern, aimed away from the vehicle surface, so there is no overspray on your repair from this nozzle test.
Spray Technique: Use good spray technique, which involves releasing the nozzle at each end of each stroke, so there is no paint buildup at the end of each stroke when you pause and change direction. For primer and paint, overlap each stroke by 50% to avoid the zebra effect of incomplete coverage. The goal is to avoid runs or sags in the paint. Hold the can 6-8” away from the surface. Don’t start the first stroke in the middle of your repair, always start spraying from one side, and always keep the spray can moving at a consistent speed and distance.
Spray the primer: Make the very first coat a light dusting to create a good tacky layer. Wait a few minutes, then apply the first of at least two more full medium heavy coats. Use 50% overlapping strokes. Aim such that you don’t build up a hard edge at your tape lines. This is best accomplished by spraying “in” from the tape edge and spraying less when covering the perimeter of your area. You can use a hair dryer 18 inches away (not too close or too much air pressure can push the paint) using no heat, to speed up the drying time in between coats. The flash time (or dry time) between coats can range from 5 minutes to 30 minutes depending on film thickness, the temperature and the humidity. At 70 degrees Fahrenheit and < 50% relative humidity, the flash time should be 5-10 minutes. Test for dryness by touching the tape near the new paint. Sand then scuff: Now is the time to feather the edge of the primer you just sprayed into the surrounding paint, so you can’t feel a hard edge between primer and the factory finish. The primer transition to any surrounding factory paint should be smooth. Wet sand the primer edge with 600 grit paper until the transition to the factory finish is smooth to the touch and no hard edge is felt. Also lightly sand the entire primed surface with 600 grit paper to de-nib and remove any blems, and for better adhesion of the color coat which is applied next.
Pro Tip: The feathered area allows the primer to blend in better in the final result. Sand the outer inch or two of the primer region to gradually thin it out and create a smooth interface to the surrounding factory finish.
Re-coating time: Do not wait more than 24 hours between the last primer coat and the first paint (color) coat. This has to do with how the last primer coat chemically “accepts” or bonds with the first base color coat. If you wait more than 24 hours, the bond between these coats is weakened.
Required for This Step
Complete or Preferred kit: You will need to have primer to do these steps.
Part 4: Paint Prep
Note: If you didn’t need primer, this is your first base color application. Review Part 2, Spray a Test Card, before proceeding.
If you DID paint primer and dry sanded it, now blow the area with compressed air, then use the tack cloth to remove any lint or dust.
DO NOT use the prep wipe on this freshly painted primer, or it will remove the primer creating streaks and an uneven surface.
Do You Have a Tri-coat?
If you have a tri-coat color, you will receive two cans of color. One is marked with an L1 (layer 1) and the other has an L2 (layer 2) at the end of the paint code.
IMPORTANT: Spray the L1 color first (base color) and the L2 color second (mid-coat).

Part 5: Spray the Color Coats
Tri-coat Colors: If your color is a “tri-coat”, it requires two separate applications, the first is the base color and the second is called the mid-coat. For tri-coat colors you will have received two cans of paint, one marked with an L1 and the other marked with an L2 after the color code. Always spray all of the L1 base color coats first if you have a tri-coat. After the L1 base layer coats have fully dried, you will then spray the L2 mid coats.
See the example tri-coat labels below:
 L1 is Base Color L2 is Mid-Coat
Note: Always spray the L1 color (base color) first if you have a tri-coat!
1. Nozzle test: Shake the can well for 3 minutes, and then make a test spray on a test card to make sure the nozzle is clear and paint is coming out properly (fully atomized with no blobs or big drops).
2. Spray the paint: If you have a tri-coat, use the can with L1 on the label as shown above. If you don’t have a tri-coat, you will only have one can, so use that one. Apply the first of 3-4 light to medium coats from a distance of 8 inches. Use 50% overlapping strokes. Aim such that you don’t build up a hard edge at your tape lines. This is best accomplished by spraying “in” from the tape edge and spraying less at the perimeter of your area.
Drying: (if your paint can has an “S” code on the back, ignore this step and don’t use a hairdryer): For all other waterborne paint you can use a hair dryer 18 inches away (not too close or too much air pressure can push the paint) using NO heat, to speed up the drying time in between coats. The flash time (or dry time) between waterborne coats can range from 10 minutes to 30 minutes depending on film thickness, the temperature and the humidity. At 70 degrees Fahrenheit and < 50% relative humidity, the flash time should be 10-20 minutes. Test for dryness by touching the protective paper near the new paint. Mistakes during base color: If you make a mistake such as a blob of paint or a nib, run, or sag happens, stop painting and let the coat dry fully (at least 30 minutes). Then DRY sand the imperfections with 1000 – 1500 grit paper, blow with compressed air, and tack cloth again.
Note: DO NOT WET SAND THE BASE COLOR. It can only be dry sanded.
Final Coat: Finish the base color application with at least one full medium coat. If your paint color is metallic or pearl, see this article for tips on applying these paints: Applying L2 (mid coat), Metallic or Pearl Finish Paint.
3. Tri-coat application: If you have a tri-coat, you have an extra paint application. Now spray 2 light coats of the L2 mid coat as a control (or drop) coat. See this Tri-Coat Paints Explained video.
4. Wait at least 60 minutes after the last paint coat has been applied before applying clear coat. The paint should be completely dry before applying clear coat.
Part 6: Prep Clear Coat
Note: Clear coat is necessary for the color match; the paint by itself won’t match your vehicle’s paint. Clear coat is applied just like the base color, however often it is applied with slightly heavier coverage than the base color, and an extra coat can be applied for more protection and gloss.
Prep for spraying clear coat by using a tack cloth to remove any lint or dust. The surface should be completely smooth and blem-free before spraying the mid-coat.
Do NOT use a prep wipe on the base color or it will remove the paint.
Required for This Step
You will need to have a tack cloth or some sticky tape to do this step.
Part 7: Spray Clear Coat
1. Nozzle test: Shake the can well for 60 seconds, and then make a test spray to make sure the nozzle is clear and clear coat is coming out properly, and uniformly.
2. Spray: Apply the first of at least two or three medium to full coats of clear. Use 50% overlapping strokes. Aim such that you don’t build up a hard edge at your tape lines. This is best accomplished by spraying “in” from the tape edge and spraying less at the perimeter of your area.
3. Masking tape removal: Immediately after clear coating, you should peel the soft edge of the masking tape off carefully so that clear coat under the tape won’t cure right up against the tape to create a hard line.
Drying: You can use a hair dryer 18 inches away (not too close or too much air pressure can push the paint) using no heat, to speed up the drying time in between coats. The flash time (or dry time) between coats can range from 5 minutes to 30 minutes depending on film thickness, the temperature and the humidity. At 70 degrees Fahrenheit and less than 50% relative humidity, the flash time should be 5-10 minutes. Test for dryness by touching the protective paper near the new paint.
Required for This Step
Any kit will have the clear coat needed for this step
Part 8: Polish Clear Coat
4. Note: Clear coat needs to fully harden and cure for 72 hours before wet sanding and then polishing.
5. WET sand the clear coat with 1500 grit and then optionally wet sand with 2000-3000 grit sandpaper to add more gloss.
6. Next, polish the clear coat with polish compound and a micro fiber towel to achieve the final gloss.
You are done!
Required for This Step
Complete kit: You will need to have polishing compound and a polishing cloth to do this step.
Before/After Photos
We suggest you take a photo of the scratch or damage before you do the repair. If you need to contact us with an application question during or after the repair, a ‘before’ photo can help us diagnose a problem and recommend next steps.
Contact Us
If you have any questions or feedback for us, please don’t hesitate to reach out to us here:
In the USA, email: [email protected]
In Canada, email: [email protected]
Summary of Dry Times
All times below assume application
temperature is 65-75 degrees F
and humidity is below 50%
Between primer coats:
30 minutes
After primer, before painting:
60 minutes – 24 hours
Between base color coats
10-20 minutes
After base color, before clear coat
60 minutes – 24 hours
Between clear coats
30 minutes
After clear coat, before polish
72 hours
After clear coat, before hand wash
72 hours
After clear coat, before machine wash
30 days
After clear coat, before waxing
30 days
After clear coat, before ceramic coat/film wrap
60 days
Cleanup and Storage
- After use, always invert the aerosol can and spray out the paint to clear the nozzle.
- Store the small supplies in a cool dry area that won’t freeze.
- Base color paint and mid-coat paint washes off with warm water and soap, UNLESS the can has an “S” code on the back, in which case it is solventborne paint and should be cleaned with paint thinner.
- Primer and clear coat wash off with paint thinner.
Guide d’instructions : peinture en aérosol
Réalisez des retouches professionnelles grâce aux trousses de peinture en aérosol ScratchesHappen. Notre guide d’instructions simplifie le processus de préparation, de pulvérisation de la peinture et de nivelage afin de vous aider à créer des retouches pratiquement imperceptibles, et ce, même si vous avez de grosses égratignures à corriger.
Soutien (É. U.) : [email protected]
Soutien (Canada) : [email protected]
Articles d’aide accessibles à : https://help.scratcheshappen.com
Version 7.4
Tous droits réservés © 2025 Replicolor USA inc.
I. Introduction
Consultez les étapes II et III pour un aperçu du processus et des produits, puis passez à l’étape IV pour commencer vos retouches professionnelles. Consultez la vidéo suivante pour obtenir les étapes d’application.
Quelle trousse de produits avez-vous acheté? Consultez les images ci-dessous afin de repérer votre trousse de produits. Ce guide d’instructions précise la trousse et le matériel requis à chaque étape. Selon la trousse que vous avez acheté, vous aurez peut-être besoin de matériel supplémentaire pour accomplir certaines étapes.
Peinture à base d’eau ou à base de solvant? Selon la couleur que vous avez acheté, il se peut que vous ayez reçu une peinture à base de solvant ou une peinture à base d’eau. Vérifiez l’étiquette sur la cannette de peinture (la couche de couleur) :
Un code « S » sur le panneau arrière indique une peinture à base de solvant.
- Si un code « S » apparaît sur le panneau arrière, il s’agit d’une peinture à base de solvant.
- Si vous voyez un autre code, comme « P », « I » ou « U », alors c’est une peinture à base d’eau. La seule étape touchée par cette distinction se trouve à la page 7, sous « Séchage ».
REMARQUE : la couche transparente doit toujours être appliquée par-dessus la couleur afin
de la sceller, la protéger et d’assurer une concordance parfaite des couleurs.
La trousse Complète (Complete)
- Carte d’essai
- Couleur(s) de base en aérosol
- Apprêt en aérosol
- Laque transparente en aérosol
- Lingettes nettoyantes
- Chiffon antistatique
- Ruban de masquage
- Ensemble de papiers abrasifs
- Chiffon de polissage en microfibre
- Agent de polissage
- Gants de nitrile
La trousse Supérieure (Preferred)
- Carte d’essai
- Couleur(s) de base en aérosol
- Apprêt en aérosol
- Laque transparente en aérosol
- Lingette nettoyante
- Gants de nitrile
La trousse Essentielle (Essential)
- Carte d’essai
- Couleur(s) de base en aérosol
- Laque transparente en aérosol
- Gants de nitrile
De quels outils aurez-vous besoin?
- Équipement de protection
- Ventilation adéquate
- Une lampe de poche ou une source d’éclairage portative à DEL (pour inspecter le fini)
- Une montre ou une minuterie
- De l’alcool isopropylique et des chiffons non pelucheux
- Un petit ventilateur portatif ou un sèche-cheveux
- Des produits de nettoyage, y compris du diluant à peinture
- Un seau d’eau pour le ponçage humide
Le saviez-vous?
Vous pouvez demander à Alexa ou à Siri quels sont le taux d’humidité et la température dans votre région.
« Dis Siri, quel est le taux d’humidité en ce
moment? »
II. Aperçu du processus
Tout d’abord, qu’est-ce qu’une peinture? Bien plus qu’un simple regroupement de pigments, la peinture est une émulsion de solides et de liquides dont les caractéristiques varient selon les propriétés chimiques de ses ingrédients. De nos jours, les peintures pour automobiles ont une formule chimique complexe qui fait intervenir de multiples composantes afin de créer une finition multicouche. Harmonisant les diverses couches, l’art et la science travaillent de concert pour produire un fini idéal.
Quelle est l’ampleur des dommages? Tout d’abord, afin de choisir le processus qui convient le mieux à vos retouches, inspectez de près la surface endommagée au moyen d’une bonne source de lumière portative à DEL (par exemple, la lampe de poche de votre téléphone intelligent). Si vous voyez du métal ou du plastique à découvert, cela signifie que vous aurez besoin d’apprêt. Si l’égratignure à corriger est très profonde, vous pourriez avoir besoin d’effectuer un ponçage humide pour lisser la surface.
Effectuer des retouches imperceptibles. Hormis la concordance de couleur, « l’invisibilité » de vos retouches nécessite un résultat nivelé, c’est-à-dire une surface sur laquelle le reflet de la lumière n’est pas déformé (ce qui peut se produire lorsque le rebord du ruban de masquage laisse une ligne visible sur le fini après le séchage, par exemple). La solution est de poncer ou de polir les limites de la zone où vous avez effectué les retouches afin que la nouvelle peinture se fonde dans l’arrière-plan.
À quoi sert la carte d’essai? Nous vous fournissons une carte d’essai afin que vous puissiez confirmer la concordance de couleur avant de travailler directement sur le véhicule. Vous pouvez vous servir d’une plus grosse surface pour vous exercer au besoin. Un morceau de carton mousse, par exemple, fonctionne très bien.
Le carton mousse peut également vous aider à vérifier la vitesse et la distance de pulvérisation qui conviennent le mieux. L’objectif est d’appliquer des couches complètes qui ne coulent et ne bavent pas. L’opacité et l’épaisseur de la peinture influeront sur le résultat : tout cela fait partie de l’art des retouches. Après que vous aurez appliqué la laque transparente et que celle-ci aura complètement séché, la couleur que vous avez choisie devrait correspondre à la couleur d’origine de votre véhicule.
Tester la laque transparente. Déterminez si votre surface est horizontale, verticale ou inclinée. Les surfaces en angle peuvent favoriser les coulures ou les bavures. Afin de vous exercer, appliquez d’abord la laque transparente sur la carte d’essai. Tenez la ensuite près du véhicule (sans le toucher), devant la surface à retoucher et dans le même angle, afin de voir si la laque coule. Si c’est le cas, réessayez en appliquant une couche plus mince. Les couches de laque transparente devraient être plus épaisses que les couches de peinture, mais pas si épaisses qu’elles produisent des bavures.
Pulvériser la peinture en aérosol
- Avant chaque utilisation, remuez la canette vigoureusement pendant trois minutes.
- Si les agitateurs à l’intérieur de la canette forment de petites bosses au-dessous de la canette pendant que vous l’agitez, cela signifie que vous le faites correctement.
- La température ambiante doit être de 18,3 à 23,8 °C (65 à 75 °F).
- Le taux d’humidité ambiant doit être inférieur à 50 %.
- Effectuez toujours un essai rapide avant de pulvériser la peinture sur votre véhicule.
- Pour vérifier si la peinture est sèche, touchez l’excédent de peinture sur le ruban de masquage au rebord de la surface retouchée.
- Lorsque vous avez terminé, videz toujours la buse de la canette; pour ce faire, mettez la canette à l’envers et pulvérisez jusqu’à ce que la buse soit vide.
III. Comprendre la peinture
Cliquez sur le lien suivant pour consulter nos articles d’aide sur l’application de la peinture.
La température de séchage. La température optimale pour faire sécher la peinture est de 18,3 à 23,8 °C (65 à 75 °F). Les températures inférieures et supérieures à cette fourchette influenceront le temps de séchage. Par exemple, les températures basses prolongeront le temps nécessaire pour que le produit devienne complètement sec.
Le taux d’humidité. S’il y a trop d’humidité dans l’air, la peinture mettra plus de temps à sécher qu’à l’habitude, et vous pourriez vous retrouver avec des « yeux de poisson » dans votre fini. Attendez que le taux d’humidité de l’air ambiant diminue. Remarque : Les « yeux de poisson » ressemblent à des petits cratères ronds dans la peinture.
Le soleil et la pluie. Évitez de travailler directement sous le soleil ou sur une surface qui a été réchauffée par une exposition directe au soleil. Dans le même ordre d’idées, évitez de travailler par temps pluvieux.
Superposer les couches. Chaque nouvelle couche de peinture agit comme un solvant sur la précédente; ainsi, la nouvelle peinture humide peut légèrement déformer ou même amincir la couche précédente. Cela signifie simplement que vous devez faire preuve de délicatesse pendant que vous travaillez, surtout si vous vous servez d’un sèche-cheveux pour accélérer le séchage. En effet, vous devez à tout prix éviter que l’appareil souffle de l’air à haute pression directement sur la peinture : assurez-vous plutôt qu’il déplace l’air par-dessus la surface. Pour ce faire, tenez l’appareil en angle, à quelques pas de la carrosserie.
L’adhésion entre la laque, la peinture et l’apprêt. Chacun de ces enduits produit une surface poreuse une fois sec, mais cette porosité disparaît une fois que le fini s’est solidifié. La porosité aide chaque couche à adhérer correctement à la précédente grâce à des liaisons chimiques. Ainsi, au moment de passer de l’apprêt à la peinture (ou de la peinture à la laque transparente), évitez d’attendre plus de 24 heures, car le produit humide n’adhérera pas bien au produit complètement sec. Si une période de 24 heures ou plus s’est écoulée depuis votre dernière couche, appliquez simplement une couche mince additionnelle du produit précédent, et laissez-la sécher moins de 24 heures avant de passer à la couche suivante.
La concordance de couleur. Tandis que vous superposez les couches de peinture, il est normal que la couleur ne semble pas correspondre exactement à la peinture d’origine du véhicule. Lorsque mouillée, la peinture à base d’eau peut avoir des reflets légèrement bleutés, qui disparaissent après que le solvant s’est évaporé (environ cinq minutes). Par la suite, vous atteindrez uniquement une concordance de couleur exacte après que vous aurez appliqué la laque transparente et que celle-ci aura complètement durci.
La concordance de couleur de notre peinture à base d’eau
Notre peinture en aérosol est à base d’eau. En raison de ses propriétés chimiques, cette peinture a des reflets légèrement bleutés lorsque mouillée. Ne craignez rien : après quelques minutes de séchage, la vraie couleur s’affichera.
Avant d’évaluer la concordance de couleur, attendez que toutes les couches de peinture et de laque transparente soient sèches.
Principes de la peinture tricouche
Pulvérisez la couleur L1 en premier (couleur de base), suivie de la couleur L2 (couleur intermédiaire).
Pulvérisez les couches de couleur intermédiaire (L2) comme une couche de contrôle. Consultez l’article suivant pour obtenir des conseils d’application.
IV. Processus de retouche
Étape 1 : Préparer la surface (ponçage et nettoyage)
1. Ponçage humide : Tout d’abord, poncez la surface à retoucher au moyen d’un papier abrasif de grain 600. Cela aidera à lisser la carrosserie et à renforcer l’adhésion de l’apprêt. Si la surface est grande (par exemple, une porte ou une aile), envisagez d’utiliser une ponceuse orbitale aléatoire à double action. Si vous n’avez pas un tel outil à votre disposition, ou que la surface à retoucher est petite, vous pouvez toujours effectuer le ponçage humide à la main.
Astuce : Lors du ponçage, assurez-vous d’enlever toute la rouille et les écailles de peinture. Poncez suffisamment pour lisser les égratignures; cependant, si elles sont trop profondes, appliquez du mastic pour carrosserie (no 2 ci-dessous). Afin de renforcer l’adhésion des produits en aérosol, poncez légèrement les rebords de la surface à retoucher. Pour ce faire, poncez de l’intérieur vers l’extérieur afin de créer un « pont » lisse entre la surface à retoucher et la peinture environnante.
2. (Optionnel) Mastic pour carrosserie : Si les égratignures à corriger sont si profondes que le ponçage ne permet pas de les faire disparaître, comblez les au moyen d’un mastic pour carrosserie comme le produit Bondo® 907 de la marque 3M. Ce produit est facile à utiliser et peut être poncé. Préparez la surface avec du papier abrasif de grain 80. Ensuite, appliquez le mastic au moyen d’une petite raclette afin de combler les égratignures de façon uniforme, puis laissez le produit sécher. Ensuite, effectuez un ponçage humide (papier abrasif de grain 320) jusqu’à ce que le mastic soit lisse. Pour ce faire, épousez le contour du véhicule avec votre main pendant le ponçage, et exercez une pression uniforme afin d’éviter de créer une surface inégale. Pour vous stabiliser, envisagez d’envelopper le papier abrasif autour d’un bloc de mousse ou de bois. Finalisez avec un papier abrasif de grain 600.
3. Nettoyage en profondeur : Nettoyez toute la surface avec de l’eau et du savon. Cette étape est très importante, puisqu’elle permet d’enlever tous les contaminants qui pourraient ruiner votre travail, notamment la cire, la graisse et la saleté accumulée sur la route. Le détergent à vaisselle de la marque Dawn fonctionne bien à cet effet. Ensuite, séchez la surface complètement. Au besoin, servez-vous d’une canette d’air comprimé ou d’un sèche-cheveux à puissance élevée pour faire sortir les gouttelettes des fentes et bien sécher la zone.
4. Masquage : Délimitez la surface à retoucher au moyen de ruban de masquage. Afin de couvrir les dommages et de pouvoir fondre vos retouches dans l’arrière-plan par la suite, collez le ruban de façon à délimiter une zone de 10 à 15 % plus grande que la surface endommagée. Recouvrez toujours de ruban les poignées de porte, les fenêtres, les socles d’antenne et toute autre surface semblable. Après avoir posé le ruban de masquage, protégez ce qui se trouve au delà de la zone avec une bâche de plastique ou du papier afin d’éviter de pulvériser la peinture au mauvais endroit (surtout si vous effectuez les retouches dehors). Pour éviter une ligne nette et visible due au ruban, nous recommandons la méthode de pliage du ruban illustrée dans la vidéo suivante.
Astuce : Essayez de délimiter la zone en suivant une « ligne », notamment la transition entre deux panneaux de carrosserie ou deux enjoliveurs, les extrémités d’une porte ou les angles d’une surface. De cette façon, il sera plus facile de fondre vos retouches dans le fini et de créer un résultat imperceptible. Solution : Évitez de simplement délimiter la zone endommagée sans laisser d’espace autour. Réfléchissez bien à la surface que vous allez délimiter, et efforcez-vous de suivre des « frontières » logiques afin qu’il soit plus facile d’effectuer par la suite une transition entre les retouches et l’arrière-plan. Ce faisant, vous éviterez de vous retrouver avec une ligne de peinture visible au milieu d’un panneau de carrosserie.
5. Dégraissage : Dégraissez la surface au moyen de la lingette nettoyante. Cette étape est très importante. S’ils ne sont pas éliminés, les contaminants (comme la graisse qui pourrait se trouver sur vos mains) provoqueront de petits trous dans le fini, appelés « yeux de poisson ». Par conséquent, vous devrez poncer et peinturer le tout de nouveau.
6. Époussetage : Frottez toute la surface au moyen du chiffon antistatique afin d’enlever la poussière.
Produits nécessaires
Trousse Complète (Complete) : Pour accomplir cette étape, vous aurez besoin des papiers abrasifs.
Grain des papiers abrasifs
L’ensemble fourni dans votre trousse contient des papiers abrasifs de grain 600, 1 000 et 1 500.
Gris foncé = 600 (sert à poncer l’apprêt ou le mastic)
Gris moyen = 1 000 (sert à poncer l’apprêt ou la peinture entre les couches)
Gris clair = 1 500 (sert à poncer entre les couches)
Étape 2 : Effectuer un essai de peinture
Commencez toujours par vous exercer sur la carte d’essai! Commencez toujours par vous exercer sur la carte d’essai! Avant d’appliquer la peinture sur votre véhicule, pulvérisez l’apprêt (si votre trousse en contient), la peinture et la laque transparente sur la carte d’essai en vous assurant de respecter les temps de séchage recommandés entre chaque couche (ces temps sont définis à la fin du présent document).
Visionnez également la vidéo suivante afin de vous familiariser avec la technique appropriée.
Distance de pulvérisation de 15 à 20 cm : Pulvériser d’une trop grande distance permet à certains pigments de couleur de sécher dans l’air et de tomber avant d’atteindre la surface. Les pigments qui ne se déposent pas correctement sur la surface de peinture affectent la correspondance des couleurs.
Laissez la laque transparente sécher avant de comparer votre carte d’essai à la couleur d’origine du véhicule. Lors de votre essai, appliquez au moins deux couches d’apprêt, trois couches de peinture et trois couches de laque transparente afin d’assurer que le résultat est représentatif de vos besoins en matière de profondeur et de couverture. Si vous appliquez trop peu de couches ou des couches trop minces, vous ne parviendrez pas à une concordance de couleur exacte, même si la couleur que vous avez choisie est la bonne.
Le fini métallique, nacré, ou L2 couleur intermédiare : Si votre peinture a une finition métallisée, nacrée ou L2 (couleur intermédiaire), consultez la vidéo suivante pour obtenir des conseils d’application.
Produits nécessaires
N’importe quelle trousse disposent de la carte d’essai nécessaire à cette étape.
Étape 3 : Pulvériser l’apprêt
Remarque : Si vous n’avez pas besoin de poser un apprêt, passez directement à l’étape 4.
1. Essai de buse : Avant de pulvériser un produit en aérosol, remuez vigoureusement la canette pendant 60 secondes, puis faites un court essai afin de vous assurer que la buse est dégagée et que le produit sort correctement et uniformément (sans gouttelettes). Faites l’essai sur une carte neuve pour bien voir le motif de pulvérisation, et tenez vous loin du véhicule pour éviter les accidents.
2. Technique de pulvérisation : Relâchez la buse à la fin de chaque trait. Si vous la maintenez enfoncée, le produit s’accumulera et formera des bosses aux endroits où vous prenez de courtes pauses avant de changer de direction. Pour l’apprêt et la peinture, superposez toujours vos traits à 50 % afin d’éviter l’effet de « fini zébré », c’est-à-dire une couverture incomplète. L’objectif est également d’éviter les coulures et les bavures. Pour ce faire, tenez la canette à une distance de 15 à 20 cm (6 à 8 po) de la carrosserie. Ne commencez pas votre premier trait au milieu de la surface à retoucher : commencez toujours à une extrémité, et veillez à ce que la canette reste en mouvement à une vitesse et à une distance constantes.
3. Pulvériser l’apprêt : Faites une première couche très mince (« saupoudrez » la surface), qui servira de base afin que la prochaine couche adhère facilement. Attendez quelques minutes, puis appliquez la première d’au moins deux couches complètes d’épaisseur moyenne. Assurez-vous de faire des traits qui se chevauchent à 50 %. Veillez également à ce que l’apprêt ne s’accumule pas au rebord du ruban de masquage. Pour ce faire, pulvérisez l’apprêt de l’extérieur vers l’intérieur à partir du ruban, et appliquez moins de produit sur le périmètre de la surface. Pour accélérer le séchage entre les couches, vous pouvez tenir un sèche-cheveux réglé à basse température à une distance d’environ 45 cm (18 po) de la surface : si vous le tenez trop près, la pression de l’air pourrait faire bouger l’apprêt. Le temps de séchage entre les couches peut varier de 5 à 30 minutes selon l’épaisseur du film, la température et l’humidité. À 21 °C (70 °F) et à un taux d’humidité inférieur à 50 %, le temps de séchage intermédiaire devrait être de 5 à 10 minutes. Pour vérifier si l’apprêt est sec, touchez l’excédent sur le ruban de masquage au rebord de la surface.
4. Ponçage puis érafler : Il est maintenant temps de fondre l’apprêt dans la peinture environnante afin qu’il n’y ait aucune ligne visible entre les deux. Pour ce faire, la transition entre l’apprêt et la peinture d’origine doit être lisse. Effectuer un ponçage de l’apprêt avec du papier abrasif de grain 600 jusqu’à ce que la transition à la peinture d’origine soit lisse au toucher et qu’aucun bord dur ne soit perceptible. Poncez également légèrement toute la surface apprêtée avec du papier abrasif de grain 600 pour éliminer les aspérités et les défauts, et pour assurer une meilleure adhérence de la couche de couleur qui sera appliquée ensuite.
Astuce : Une transition lisse entre l’apprêt et la peinture d’origine permet de créer un résultat imperceptible. Pour créer cette transition, évitez de poncer uniquement les extrémités de la surface recouverte d’apprêt : étendez le ponçage vers l’extérieur, sur environ 2,5 à 5 cm (1 à 2 po) additionnels, afin que l’apprêt s’amincisse graduellement et se fonde dans l’arrière-plan.
5. Délai entre les étapes : Ne laissez jamais plus de 24 heures s’écouler entre votre dernière couche d’apprêt et votre première couche de peinture. Sinon, en raison de ses propriétés chimiques, l’apprêt « refusera » que la couleur de base y adhère correctement. En effet, après 24 heures ou plus, le lien entre les couches s’affaiblit.
Produits nécessaires
Trousse Complète (Complete) ou Supérieure (Preferred) : Pour accomplir cette étape, vous aurez besoin de l’apprêt.
Étape 4 : Peinture (préparation)
Remarque : Si vous n’aviez pas besoin de poser un apprêt, la première couche de couleur de base sera votre toute première couche. Consultez l’étape 2 (Effectuer un essai de peinture) avant de commencer.
Si vous avez posé un apprêt et l’avez poncé à sec, vous devez maintenant éliminer la poussière à la surface, puis l’essuyer avec le chiffon antistatique afin d’enlever les résidus et la poussière.
NE nettoyez PAS la surface recouverte d’apprêt avec une ligette nettoyante. Sinon, vous risquez d’estomper l’apprêt ou de créer des rayures.
Avez vous une trousse de peinture tricouche?
Le cas échéant, votre trousse comportera deux canettes de peinture. L’une des canettes affichera l’identifiant L1 à la fin du code de couleur, tandis que l’autre affichera l’identifiant L2.
IMPORTANT: Pulvérisez la peinture L1 en premier (couleur de base), suivie de la peinture L2 (couleur intermédiaire).
Étape 5 : Peinture (application)
Pour la peinture tricouche : L’application se divise en deux volets; la couleur se base, suivie de la couleur intermédiaire. Votre trousse contient deux canettes de peinture, dont le code de couleur contient l’identifiant L1 ou L2. Pulvérisez toujours les couches de couleur de base (L1) en premier. Après que ces couches ont complètement séché, pulvérisez les couches de couleur intermédiaire (L2).
Voici à quoi ressemblent les étiquettes des canettes dans les trousses de peinture tricouche :
Couleur de base (L1) Couleur intermédiaire (L2)
1. Essai de buse : Remuez vigoureusement la canette pendant 3 minutes, puis faites un essai sur une carte afin de vous assurer que la buse est dégagée et que la peinture sort correctement et uniformément (complètement atomisée, sans gouttelettes).
2. Pulvériser la peinture : Si vous avez une trousse de peinture tricouche, appliquez d’abord la peinture dont l’étiquette affiche l’identifiant « L1 » comme dans l’exemple ci-dessus. Si vous avez une trousse ordinaire, celle-ci ne contient qu’une seule canette de peinture de couleur. Appliquez trois ou quatre couches minces à une distance constante d’environ 20 cm (8 po). Assurez-vous de faire des traits qui se chevauchent à 50 %. Veillez également à ce que la peinture ne s’accumule pas au rebord du ruban de masquage. Pour ce faire, pulvérisez la peinture de l’extérieur vers l’intérieur à partir du ruban, et appliquez moins de produit sur le périmètre de la surface.
Séchage : (Si votre cannette de peinture a un code “S” à l’arrière, ignorez cette étape et n’utilisez pas de sèche-cheveux.) Pour toutes les autres peintures à base d’eau, vous pouvez utiliser un sèche-cheveux tenu à environ 45 cm (18 po) de la surface (ne le tenez pas trop près ni avec trop de pression d’air, car cela pourrait déplacer la peinture), sans chaleur, pour accélérer le temps de séchage entre les couches. Le temps de séchage (ou « flash time ») entre les couches à base d’eau peut varier de 10 à 30 minutes selon l’épaisseur de la couche, la température et l’humidité. À 21 °C (70 °F) et un taux d’humidité relative inférieur à 50 %, le temps de séchage intermédiaire devrait être de 10 à 20 minutes. Vérifiez la sécheresse en touchant le papier de protection près de la nouvelle peinture.
Les erreurs : Si vous commettez une erreur pendant l’application de la couleur de base (gouttelettes de peinture, coulures, bavures…), cessez de pulvériser le produit et laissez votre dernière couche sécher complètement (au moins 30 minutes). Ensuite, poncez À SEC les imperfections au moyen d’un papier abrasif de grain 1 000 ou 1 500, puis nettoyez de nouveau la surface avec de l’air comprimé suivi du chiffon antistatique.
Remarque: N’EFFECTUEZ JAMAIS DE PONÇAGE HUMIDE SUR LA PEINTURE. Elle ne peut être poncée qu’à sec.
3. Application de la peinture tricouche : Si vous avez une trousse de peinture tricouche, vous devez accomplir une étape additionnelle. Pulvérisez deux couches minces de la couleur intermédiaire (L2), comme des couches de contrôle. Consultez la vidéo suivante pour obtenir des conseils d’application.
4. Attendez au moins 60 minutes après que votre dernière couche de peinture a séché avant d’appliquer la laque transparente. En effet, la peinture doit être complètement sèche.
Étape 6 : Laque transparente (préparation)
Remarque : Il est nécessaire d’appliquer la laque transparente pour atteindre une concordance de couleur exacte; en effet, la peinture à elle seule ne correspondra pas à la couleur d’origine du véhicule. La laque transparente s’applique de la même manière que la peinture; cependant, les couches de laque doivent être légèrement plus épaisses que celles de peinture. Vous pouvez également appliquer une couche supplémentaire de laque afin d’accroître la protection et la brillance du fini.
Préparation : Avant de pulvériser la laque transparente, retirez tous les résidus et la poussière au moyen du chiffon antistatique. En effet, la surface doit être complètement lisse avant de commencer.
NE nettoyez PAS la surface recouverte de peinture avec une lingette nettoyante. Sinon, vous risquez d’estomper la peinture.
Produits nécessaires
Pour accomplir cette étape, vous aurez besoin du chiffon antistatique ou de ruban adhésif.
Étape 7 : Laque transparente (application)
1. Essai de buse : Remuez vigoureusement la canette pendant 60 secondes, puis faite s un essai afin de vous assurer que la buse est dégagée et que le produit sort correctement et uniformément.
2. Pulvériser la laque : Appliquez la première de deux ou trois couches complètes d’épaisseur moyenne. Assurez vous de faire des traits qui se chevauchent à 50 %. Veillez également à ce que le produit ne s’accumule pas au rebord du ruban de masquage. Pour ce faire, pulvérisez la laque de l’extérieur vers l’intérieur à partir du ruban, et appliquez moins de produit sur le périmètre de la surface.
3. Retrait du ruban de masquage : Immédiatement après l’application du vernis, vous devez retirer délicatement le bord souple du ruban de masquage afin que la couche de vernis sous le ruban ne durcisse pas directement contre celui-ci, ce qui pourrait créer une ligne nette.
Séchage : Pour accélérer le séchage entre les couches, vous pouvez tenir un sèche cheveux réglé à basse température à une distance d’environ 45 cm (18 po) de la surface. Si vous le tenez trop près, la pression de l’air pourrait faire bouger la laque. Le temps de séchage entre les couches peut varier de 5 à 30 minutes selon l’épaisseur du film, la température et l’humidité. À 21 °C (70 °F) et à un taux d’humidité inférieur à 50 %, le temps de séchage intermédiaire devrait être de 5 à 10 minutes. Pour vérifier si la laque est sèche, touchez l’excédent sur le papier/plastique de protection au rebord de la surface.
Produits nécessaires
N’importe quelle trousse : Pour accomplir cette étape, vous aurez besoin de la laque de finition transparente.
Étape 8 : Ponçage humide et polir la laque transparente
Remarque : Attendez au moins 72 heures avant de un ponçage humide et polir la laque transparente. Elle doit avoir complètement durci.
- Effectuez un ponçage humide (papier abrasif de grain 1 500) sur la laque transparente et ensuite effectuez un ponçage humide (papier abrasif de grain 2 000 à 3 000) pour ajouter plus de brillance.
- Et puis, au moyen de l’agent de polissage et du chiffon en microfibre, polissez la surface recouverte de laque transparente afin d’atteindre un fini lustré.
- C’est fait!
Produits nécessaires
Trousse Complète (Complete) : Pour accomplir cette étape, vous aurez besoin de l’agent de polissage, du chiffon de polissage en microfibre et de papier abrasif.
Photos avant/après
Nous vous suggérons de prendre une photo de la rayure ou des dommages avant de procéder à la réparation. Si vous devez nous contacter avec une question relative à une application pendant ou après la réparation, une photo « avant » peut nous aider à diagnostiquer un problème et à recommander les étapes suivantes.
Nous joindre
Si vous avez des questions ou de la rétroaction, n’hésitez pas à communiquer avec nous à l’une des adresses de courriel ci-dessous.
Aux États-Unis : [email protected]
Au Canada : [email protected]
Récapitulatif des temps de séchage
Les durées ci-dessous supposent une température ambiante de 18,3 à 23,8 °C (65 à 75 °F) et un taux d’humidité inférieur à 50 % lors de l’application.
Entre les couches d’apprêt : 30 minutes
Entre l’apprêt et la peinture : De 60 minutes à 24 heures
Entre les couches de peinture : De 10 à 20 minutes
Entre la peinture et la laque transparente : De 60 minutes à 24 heures
Entre les couches de laque transparente : 30 minutes
Avant de polir la surface : 72 heures
Avant de nettoyer la surface à la main : 72 heures
Avant de passer au lave auto : 30 jours
Avant de cirer la surface : 30 jours
Avant de poser un revêtement céramique/une pellicule thermoplastique : 60 jours
Nettoyage et rangement
- Lorsque vous avez terminé, videz toujours la buse de la canette; pour ce faire, mettez la canette à l’envers et pulvérisez jusqu’à ce que la buse soit vide.
- Rangez les petites fournitures dans un endroit frais et sec où elles ne pourront pas geler.
- Les taches de peinture se lavent à l’eau tiède avec du savon doux. À MOINS qu’il y ait un code « S » au dos de la cannette — dans ce cas, c’est une peinture à base de solvant, et il faut la nettoyer avec du diluant à peinture.
- Pour nettoyer les taches d’apprêt ou de laque transparente, vous devrez utiliser du diluant à peinture.